This Weekend's a Great Time To Build a Breakfast Nook - Here's How

This Weekend's a Great Time To Build a Breakfast Nook - Here's How

Small Projects and Repairs
Additions and Remodels
Kitchen Remodeling
By Contractors.com Team June 15, 2021

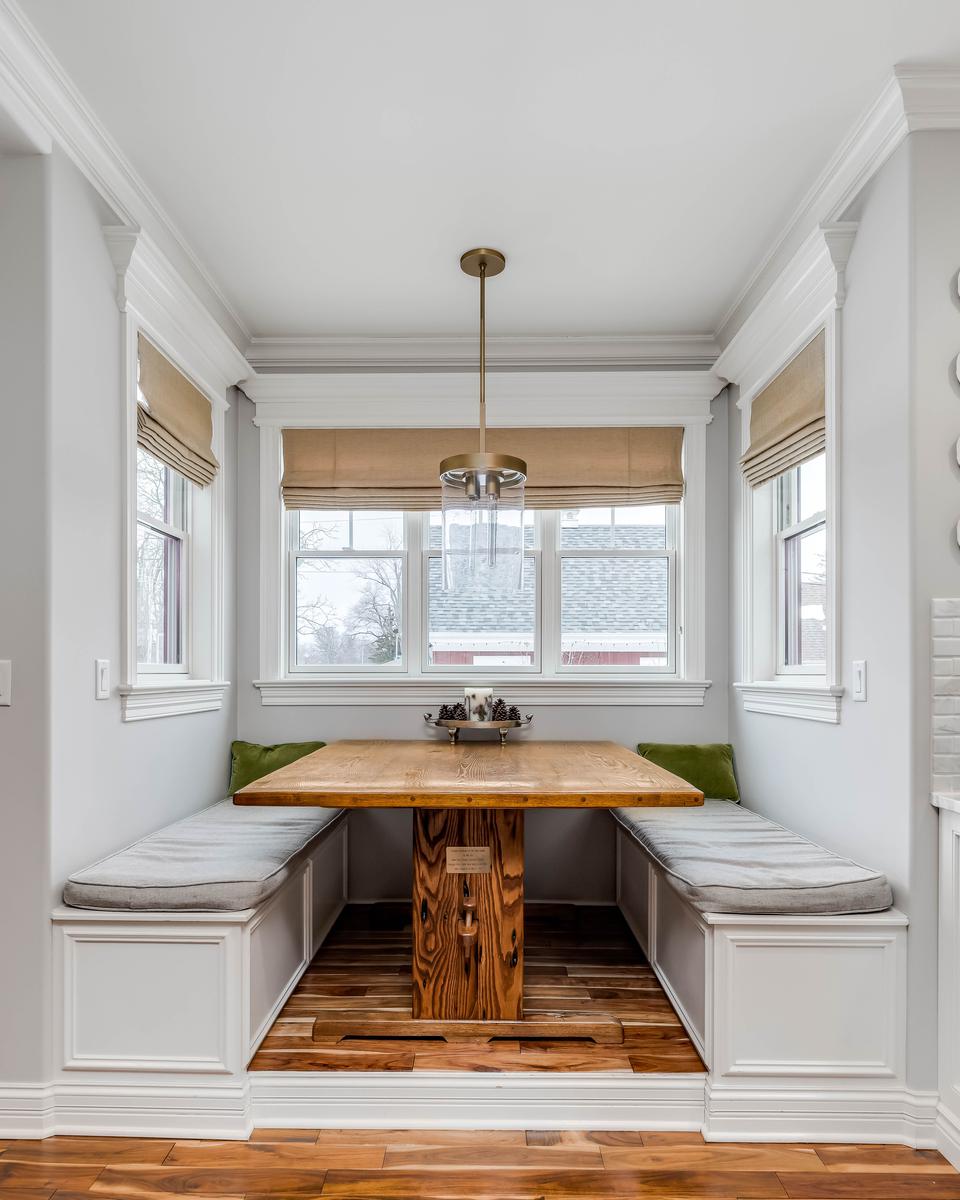
Breakfast. It’s the irresistible first meal of the day and, as such, sets the tone for how the day can go. A good breakfast can determine how you feel when you head out the door to start each day. But what good is breakfast, if you don’t have a place to enjoy it in? It’s all well and good to have some luxurious pancakes with thick chocolate syrup and a cup of coffee, but why enjoy the most special meal in an ordinary place like a dining room, countertop, or on the go? 

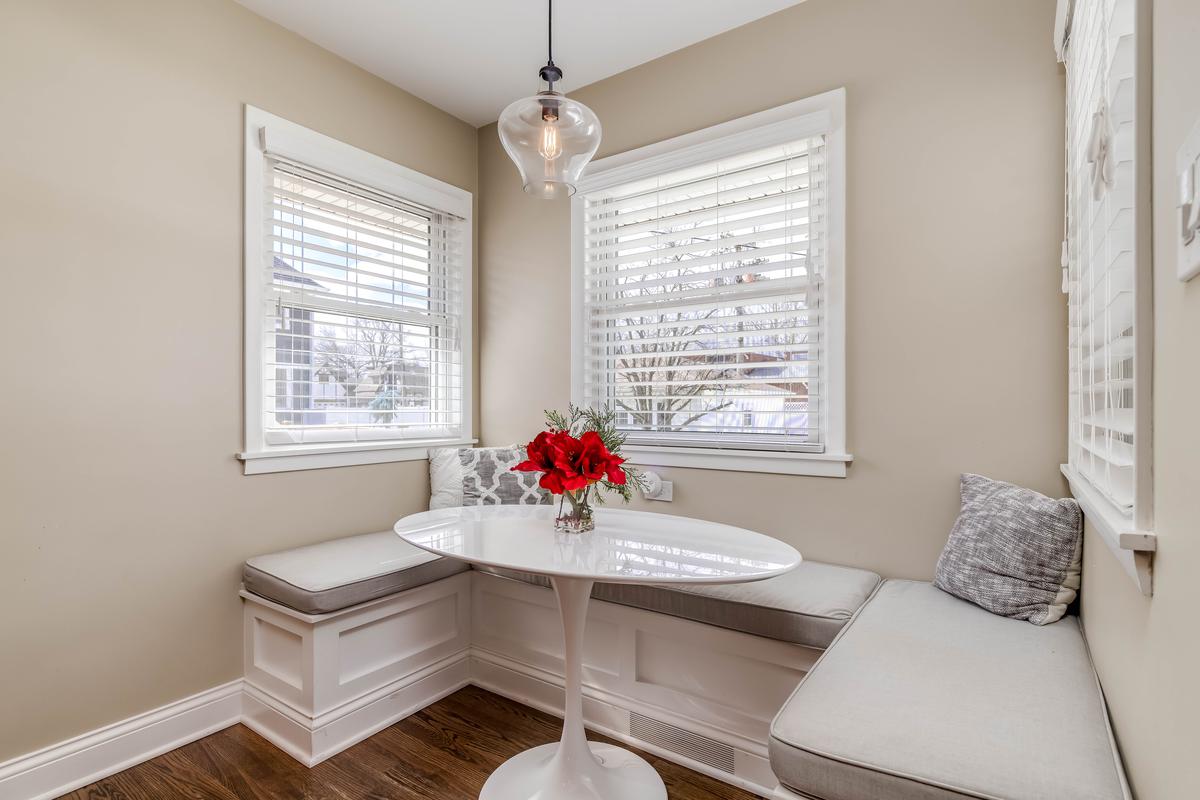
You could go to the living room and enjoy your breakfast there, but that could get sticky real fast. Breakfast deserves its own space in your house and if you don’t already have a quaint and calm place to eat in your kitchen, it’s ok. Luckily, building a DIY breakfast nook doesn’t take up much space in the average home. To top it off, it's one of those dynamic spaces that can be many things: a small library for your interior design books, a place for your coffee machines, a productivity center, and a breakfast nook, all in one. If you’ve ever wondered how to build a breakfast nook, wonder no longer. 

A breakfast nook is affordable and simple to build and can be done in no time. It’s the perfect way to refresh your home’s dining facilities with an addition that’s both convenient and trendy. 

Finding The Right Spot, Drawing Up Plans

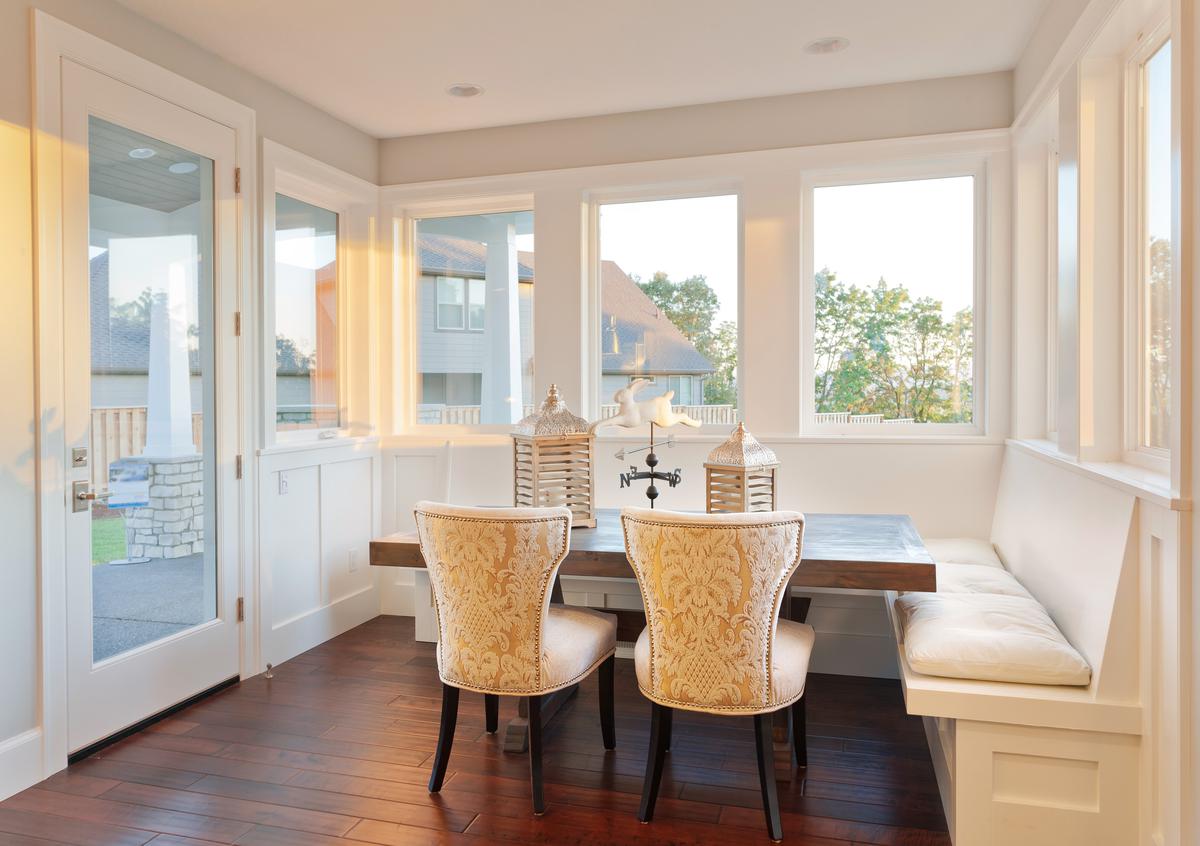
If you have an antiquated dining room with a huge oak table and those stately china cabinets, this is your chance to reimagine that space. Sure, a grand dining room is nice to have, especially if you’re often receiving lots of guests. But many of us aren’t using this space regularly enough to justify having it. Having something cozy like a breakfast nook allows us to make better use of the space we have whilst also modernizing how we use them.

Finding The Right Spot for Your Breakfast Nook

Finding The Right Spot for Your Breakfast Nook

Generally, you’re looking for a corner of your house that is open and airy. The breakfast nook in this guide will consist of an L-shaped breakfast nook bench, a table, and some chairs. The precise measurements depend on the kind of nook you want and the space you have to work with. If you’re pining for a classic breakfast nook, you’ll need enough space for an L-shaped bench that’s around 12’x5’, give or take. 

In any case, just be sure that the bench you draw up in your designs will fit the space you have. Height is also at your discretion, but in general, you should aim for the height of your breakfast nook bench to be the same as the chairs you intend to use. The standard dining chair seat is about 18 inches off the ground, so you can use this as the minimum height of your breakfast nook bench.  

Building the Frame

You’ll need the following tools and materials:
Screws 
Miter saw
Power drill 
Kreg jig
12-14 2”x4”s 
¾ inch thick plywood board
Felt pads for furniture feet
Screw hooks

The frame of your breakfast nook bench will be made up of 12 to 14 2”x4”s. (It’s always recommended to buy more 2”x4”s and screws than you think you’ll need so you avoid coming up short.) Once you’ve measured the 2”x4”s and cut them to the lengths you need with a miter saw, put in diagonal screw holes in your planks of wood with the Kreg jig. 

This special tool allows you to drill the holes that will allow you to fasten 2”x4”s together that meet perpendicularly. Put simply, this will allow you to assemble the planks of wood so they make a box, where each edge of the box is secured by screws. Once the frame is done, it will look like two long crates that are reinforced on the top and bottom by 2x4 beams. 

How to Build a Breakfast Nook

How to Build a Breakfast Nook

As you construct the frame it’s a good idea to add some felt pads to each corner of the underside of the frame. This will make the bench easier to move, keep the frame from scuffing up the floor, and will also stop it from making any unpleasant scraping noises. Once the frame is built you may find that there is a gap between it and the wall due to the baseboard. 

Rather than removing your baseboard, which can be a time-consuming and difficult process, you can add a ¾ inch board of plywood to the outer edge of the bench to close the gap neatly. Put in a few screw hooks to secure the bench to the wall, but don’t secure the bench yet. Expect this step to take a day at least. If you want some extra guidance, a carpenter will be more than happy to help you out.   

Installing Trim

You’ll need the following tools and materials:
Electric sander
Nail gun
Gorilla glue
2-3 ¾”x3” painted pieces of trim
¾ inch thick plywood boards (2-3)

Once the frame has been built and secured, it’s time to take away its rough edges with some nicely painted trim pieces. It’s up to you which color you want the pieces to be, but white is the classic go-to choice because it fits in with so many interior designs. This trim can be as simple or as intricate as you want it to be. 

In our design, the trim consists of some plywood that lines the inward-facing part of the bench and is framed with white trim pieces. After sanding, the plywood is attached with a nail gun, while the trim is attached with gorilla glue to give your breakfast nook bench a sleek look. You may have to do some sanding to smooth out the surface. 

This shouldn’t take longer than a day. 

How to Install the Trim of Your Breakfast Nook

How to Install the Trim of Your Breakfast Nook

Painting

You’ll need the following tools and materials:
3-4 coats of paint
1-2 coats of sealer

Now that your trim is installed you can start painting. These numbers are a general guideline, and you may find that you require more or fewer coats of paint depending on the size of your breakfast nook bench. Each coat of paint will take an hour or two to dry, so expect this whole process to take at least a day. 

It is recommended that you use brush-on paint rather than aerosol paint since this will avoid accidentally getting paint where you don’t want it. In any case, you should put some packing paper under the benches before painting to prevent any mess. 

What to Expect When Painting Your Breakfast Nook

What to Expect When Painting Your Breakfast Nook

Once the paint and sealer coats have dried, you can attach the breakfast nook bench to the wall with the screw hooks you installed earlier, as well as attach the two long ‘crates’. Be sure to avoid using paints, primers, or sealers intended for outdoor use. These materials can often have quite strong odors which you don’t want in your breakfast nook, especially if you want to have good interior air quality. Don’t hesitate to get in touch with a painter if you’re not sure which paints to choose.   

Seating

You’ll need the following tools and materials:
1 sheet of ¾ inch plywood
Power drill, screws
Wood filler
Paint
Trim
Saw 

When you put your DIY breakfast nook bench in its corner, you may find that your walls aren’t strictly even. This is a fairly common issue, and all you have to do is make slight adjustments for the bench to fit. But when it finally slots in, it’s time to work on the seating. First, you need to put something on top of the bench, and some painted plywood sheets should do the trick. 

To attach the plywood sheets, you need to drill in screws that attach the sheets to the frame of the nook bench. This will leave some holes, but those can be filled with wood filler for a neater appearance. After installing these sheets, you should sand them before painting. After the paint has dried, expect some gaps left between the wall and the plywood sheets. You can fill those with some trim which you can measure and cut with a wood saw.

Bring The Ensemble Together

Now that the bench is complete, a central part of your breakfast nook is done. Now it’s time to bring in the other actors in your idyllic breakfast play. A small but simple breakfast table is something you can find in garage sales, along with some appropriately rustic chairs (optional). You can also get in touch with a carpenter for a custom-made table that will fit like a puzzle piece. 

The Perfect Breakfast Nook for Your Quiet Moments to Recharge

The Perfect Breakfast Nook for Your Quiet Moments to Recharge

Bonus Tips

Let There Be Light

If you have a corner with plenty of natural light coming in, it’s a perfect spot for a breakfast nook. Ideally, you want your bench to sit in a place with big windows so you can watch the light of the morning gently trickle inside as you enjoy your morning coffee. Installing a skylight will bring in more light still, as well as give your breakfast nook a more biophilic feel. 

Make It Comfy

If you wish, you can have some padding custom-made to fit your bench, or just get some colorful throw pillows. Continually refreshing a small vase of flowers will add more color to your nook, perfect for giving it a rustic and cozy feel. 

Making Your Breakfast Nook a Cozy Place to Unwind

Making Your Breakfast Nook a Cozy Place to Unwind

Make It “i”-Device Friendly 

The space you choose might have a power outlet in the way. But don’t let that stand in the way because power outlets can easily be relocated. You can have them come out on the side of your breakfast nook bench or even custom build an outlet hole in the bench. Power outlets aren’t too difficult to relocate, especially since you don’t have to do any time-consuming rewiring. 

This also presents a great opportunity to upgrade the outlet to one that supports USB or USB C for your devices, as well as one that has a ground fault circuit interrupter (GFCI) which will cut the power if anything short circuits (from a spill for example). If you’d prefer, an electrician can help you to ensure the relocation of the power outlet goes off without a hitch.

Written by
Contractors.com Team

Written by Contractors.com Team

Welcome to the Contractors.com Team, a group of passionate individuals dedicated to helping homeowners achieve their dream home through the best-in-class service providers and inspiring content.


We believe that every homeowner deserves to have a home that they love, and we're committed to making that a reality. Whether you're looking to remodel your kitchen, renovate your bathroom, or build your dream home from scratch, we've got you covered.


When it comes to creating content, we take a multi-faceted approach. We gather insider tips from experts in the home service industry, and do our own thorough research to write informative and engaging articles that are tailored to our readers' needs. At the same time, we harness the power of A.I. and GPT-3 technologies to generate titles, headlines, and even entire articles that are optimized for SEO and designed to provide value to our readers.


We're committed to providing the best possible service to our readers, and we're always looking for ways to improve. Whether you're a homeowner looking for inspiration or a service provider looking to join our network, we're here to help you achieve your goals.

comments